Planting Plan
♣
Three patch distributions are optional: clumped, random, or uniform. Map coordinates (x, y) are presented. Patches are labeled with letters (A–L). Species are listed with links and numbers of patches, plants, and lb seeds.
Planning for Bumble Bees
Planting plans are adaptive management cycles composed of eight phases:If you perform assessments and select options (phase 1), then the Planner will produce planting plans for phases 2–8. Beginner: observe, assess, and prepare. Intermediate: propagate, install, and monitor. Advanced: maintain, evaluate, and adapt. Coordinate community plantings to spread the buzz.
- Assessing
- Designing
- Preparing
- Propagating
- Installing
- Maintaining
- Monitoring
- Evaluating
1. Assessing
Assessments determine appropriate places (☼) for plantings (♣). Planning without assessing can expand imagination, but risks problematic plantings. Select options based on site topography: more values for specificity; less values for genericity.Consult the USDA Web Soil Survey to get detailed soil maps for a planting site. View the USDA Plant Hardiness Zone Map to determine the average annual extreme minimum temperatures for a site. Research the USFW Endangered Species Database to protect endangered or threatened species. Check local regulations.
- Sites in sun (> 6 hrs) with moist, well-drained, and flat or gently graded soils, weak plant cover, and easy access are superior
- Sites in shade (< 3 hrs) with poor-drained or steeply graded soil, strong plant cover, or disturbance risks are inferior
Intend to create plantings inspired by existing bumble bee habitats. Identify native bumble bee flowers already growing on-site for conservation and restoration. Repeat and/or supplement extant plants to enhance site-specific communities. Conserve existing flowers through adaptive propagation and maintenance detailed below.
Locate existing habitats and areas that can be protected or conserved. Protect sensitive places from erosion, exploitation, invasion, and pollution. Preserve areas of bare soil or sparse vegetation, snags, and plants with hollow or pithy stems. Conserve piles of brush, gravel, or sand. Defend water sources. Determine land use histories and vistas.
The Planner requires a minimum length or width of 10 feet, min. area of 360 square feet, and maximum area of 43,560 square feet (one acre). Planting sizes of ≥ 3,600 square feet are recommended to host diverse populations of bumble bees. Measure planting areas with a map, tape, or wheel and stake corners. Marked fields are
required .2. Designing
The Planner designs ≤ 12 species plantings. Continuous blooms, nursery availabilities, and ratings are prioritized. Species are grouped in 10 square foot patches of 7–12 plants. A 360 square foot planting has 36 patches, ≥ 3 patches per species, and ~250–450 plants.Three planting features are optional: Insectary = Annuals + Biennials + Short-Lived Perennials; Wildflower = Biennials + Perennials; Shrubland = Perennials + Shrubs + Trees.
Modify designs according to site assessments and personal preferences. Click images to swap or drop species. Add native plants who have matching flowers (✿), places (☼), and habitats (♣). Customize plantings with perks (+). Re-design above.
3. Preparing
Plantings are grounded in preparation. More care and effort spent reducing plant cover before installation results in improved establishment and reduced maintenance. Recommended preparation methods include no-till sheet mulching and/or reduced-till smother cropping.Horticulture requires training, practice, and care for health. Guard your body by knowing your physical limitations, wearing protective gear, and wielding clean and sharp tools. Wear closed-toed boots, long pants and sleeves, gloves, hats, masks, earplugs, and goggles to defend yourself while working.
3.1. Sheet Mulching
Sheet mulching is a low-maintenance and no-till preparation method that regulates plant cover by smothering. Cover is suppressed and prevented from germinating with layers of biodegradable barriers. Sheet mulch improves soil health while retaining nutrients and water.Sheet mulch works well for small plantings that are sunny or shady, flat or gently sloping, and rocky. Sheet mulch is not recommended for sites with aggressive or deep-rooted perennial cover. Tools needed: mower, scythe, trimmer, aerator, irrigation, and mulch.
Carbon and nitrogen based mulches are layered to mimic forest soils. Carbon mulches include recycled cardboard or paper (without ink, tape, staples, or wax), leaves, or wood chips. Nitrogen mulches include composted and seed-free manures, meals, or residues.
The Planner calculates the volume (yd3) of mulch required: volume = length × width × depth. Depth = 3" of bark mulch or wood chips. Obtain mulches from local sources or create your own by chipping, felling, or logging.
Sheet mulching takes from 3–12 months to successfully smother existing plant cover, including lawns. Sites with weak cover require less preparation time than sites with strong cover. Start when sites are accessible during spring or autumn and maintain throughout the year.
♣ Ensure sheet mulch receives > 1" of water by irrigation or rain per week. Remove weeds growing around or in mulch. Transplant or sow into after the barrier has decomposed.
- Burn, scythe, trim, or mow existing vegetation
- Aerate compacted soils to a depth of 6–12" and water
- (Optional) Dust with fertilizers and water
- Lay paper barrier, overlap 8", and water
- (Optional) Spread compost to ~1" and water
- Spread wood chips to 3" and water
AND/OR
3.2. Smother Cropping
Smother cropping is a high-maintenance and tillage-based site prep method that regulates plant cover by smothering. Cover is suppressed and prevented from reproducing with a canopy of fast-growing annuals. Smother crops improve soil health and can provide nectar and pollen for bumble bees.Successful site preparation is achieved when planting areas are clear of weeds. Avoid soil disturbances after site preparation to reduce germination of weed seed banks. If planting areas remain weedy after preparations, then multiple years of site prep may be required for adequate cover suppression.Smother crops work well for large and sunny plantings with weak to strong cover that have access to cultivation gear and irrigation. Smother crops are not recommended for steep sites that are sensitive to erosion. Tools needed: irrigating, mowing, tilling, and sowing gear, water, and seeds.
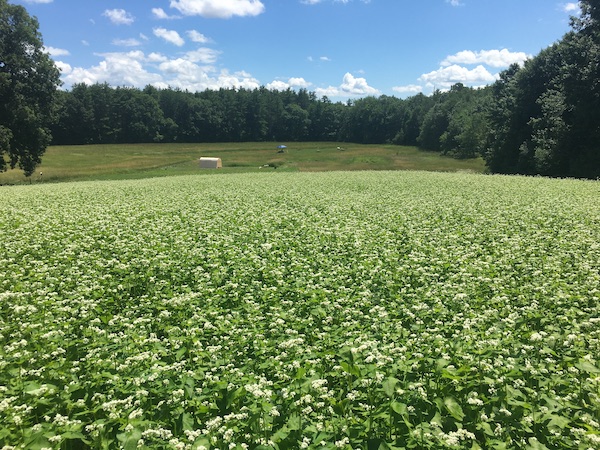
Buckwheat smother crop courtesy of Agrarian Trust.Recommended smother crops are Buckwheat (Fagopyrum esculentum) and Lacy Phacelia (Phacelia tanacetifolia). Buckwheat works well for cool, moist, and well-drained sites with weak to strong plant cover. Lacy Phacelia works well for hot, dry, and well-drained sites with weak plant cover.

Phacelia smother crop courtesy of Agrarian Trust.Measure and mark site areas to determine the pounds of seeds required. Sow minimum rates of 70 lb/ac Buckwheat or 15 lb/ac Lacy Phacelia per smother crop for adequate regulation. Purchase pesticide-free seeds from local sources. Harvest and sow your own smother crop seeds in future years.
Smother cropping takes 6–18 months to successfully suppress plant cover. Overall, sites with weak plant cover require less preparation time than sites with strong plant cover. Setbacks or delays plus poor germination can risk multiple years of smother crops for adequate regulation.
♣
- Burn or mow and till to ≤ 2" during early spring
- Repeat tillage every 2–3 weeks throughout spring
- Harrow or rake to prepare seedbeds during late spring
- Sow smother crop and incorporate with harrow or rake
- Irrigate and monitor for ≤ 1 week; Oversow gaps
- (Skip for Phacelia) Mow Buckwheat after 6–7 weeks
- (Skip for Phacelia) Repeat steps 3–5
- Mow smother crop and remove residue during early fall
- (Optional) Repeat steps 3–8 next year
- Install into weed-free seedbeds during fall
4. Propagating
If direct sowing a planting, then skip ahead to sowing. Most bumble bee flowers can be grown from seeds and many can be grown from cuttings. Loop propagating, installing, and maintaining practices for self-reproduction. Sustainably harvest < 1:100 wild seed heads or plants based on local abundance determined by assessments.4.1. Bedding
Prepare permanent sheet mulched nursery beds that can become planted nursery beds or new plantings. Place mulched nursery beds to meet the needs of planting selections. Stage labeled nursery pots in blocks or patches.Construct temporary outdoor nursery beds. Edge beds with 5" boards buried 2" deep. Line with fabric for permeability or pond liner filled with coarse sand for impermeability. Shade nursery beds under 30% shade net or within shade houses.
4.2. Saving
Collect ≤ 20% of available seeds per year: harvest abundant perennials more than rare annuals or biennials. Seeds often ripen 2–5 weeks after peak blooms and appear dry, firm, and brown, black, or grey. Spread seed harvests across plantings to maintain diversity and enhance species resilience.Harvest seeds by hand for targeted collections. Use bags, buckets, combs, gloves, and pruners. Prevent capsules or pods from breaking with bags or bands. Rake seeds free with combs. Prune and collect heads for sowing or processing. Separate seeds from chaff during or after collections.
Harvested seeds can be immediately sown or processed for future propagation. Dry seeds in open containers or shaded areas with good air circulation for ~2 weeks to prevent molds. Thresh dried seeds by hand or foot to break or crush and detach seeds from chaff.
Screen threshed seeds through gauges of wire mesh or sieves to separate seeds from large chaff. Winnow screened seeds by pouring seeds into containers set in front of fans to free seeds from small chaff. Store screened or winnowed seeds in labeled and sealed containers in cool, dark, and dry locations.
4.3. Seeding
Grow your own transplants in seeder trays filled with fine potting soil. Construct open 3 × 11 × 21" seeder trays, leaving 3/16" between bottom boards for drainage. Fill clean seeder trays with sifted seedling mix: 1 part coconut coir, 1 part compost, 1 part fine vermiculite.Plant seeds into trays during mid-fall. Sow smaller seeds on the soil surface and larger seeds at depths = 2 × seed diameters. Add species-specific mycorrhizal inoculum as needed. Cover seeds with a thin layer of clean sand or fine vermiculite and label.
Place sown seeder trays on gravel or wood chips in permanent or temporary nursery beds. Cover sown trays with hardware cloth or floating row cover to protect from herbivores. Monitor trays during winter and spring months to ensure protection and observe germination.
If access to outdoor space is limited, then cold-moist stratification can be performed indoors. Mix 1 part seed with ~3 parts moist sand (± inoculum) in sealable plastic bags, label, and refrigerate during winter. Remove stratified seeds from refrigeration around last frost and sow seeder trays.
♣ 4.4. Potting
Transplant seedlings with first true leaves into 50-cell deep plug trays filled with seedling mix. Loosen soil under seedlings with a widger. Hold leaves and preserve soil on roots while supporting with the widger. Press widger into cells to create shallow holes deeper than in trays. Drop seedlings into holes up to first true leaves. Lift out widger and do not bury.Label and irrigate plug trays ≥ 1–2" of water per week: mimic gentle rainfall with upward-pointing nozzles, sprinklers, or wands. If indoors, then move trays to cold frames for 1–3 weeks before setting outdoors during cold weather. Grow seedlings in labeled trays seldom protected with cloches or ≤ 1" mesh wire cages until late spring or early summer.
Fill nursery pots (trade size #1, 0.63 gal) with coarse potting soil: 1.5 part coir, 1.5 part compost, 1 part bark, and 1 part vermiculite. Transplant three plugs into each nursery pot during summer or fall: species with similar cultural needs can be mixed. Mulch transplanted nursery pots with a thin layer of fine mulch. Water ≥ 1–2" per week as described above.
♣ 4.5. Cutting, Dividing, Grafting, Layering
Grow your own flowering shrubs and trees by vegetative propagation. Cutting, dividing, grafting, or layering of crowns, runners, stolons, or shoots are standard methods. Loop vegetative propagating with maintenance pruning practices detailed below.Obtain transplants and seeds from local or regional nurseries. Source healthy and pesticide-free plants. Find native plant nurseries online at Plant Native: https://plantnative.org. Inspect plant health before installing: only install disease-free and pest-free plants with healthy roots, stems, and leaves. All containerized or balled-and-burlaped plants should be weed-free and neither girdled nor root-bound.Cut with clean, dry, sharp blades under nodes. Heal or wound cuttings to promote rooting. Take softwood, hardwood, bud, or leaf cuttings from stem tips or lengths. Select healthy, mature, straight hardwood cuttings, ≥ 8" long and ~0.1" wide during dormant season.
Plant cuttings 2/3 deep in nursery pots with coarse potting mix as above. Take 3–4" softwood cuttings during spring. Place softwood cuttings in water immediately after pruning. Mist and heat softwood cuttings for 6–10 weeks. Train and maintain all cuttings for 2–3 years as detailed below.
5. Installing
Install plantings with transplants, seeds, or mixes of both. Transplants work best for smaller plantings; Seeds work best for larger plantings. Install only after successful site preparation has been achieved. Schedule installations to occur during calm, cloudy, and humid days. Avoid installing during hot, wet, or windy weather.5.1. Transplanting
Mark prepared beds with washable chalk spray paint using grid map coordinates. Marked beds help preserve designs when incrementally installing plantings. Stage patches before matrices. Space transplants evenly throughout each patch and blend patch edges. Minimize soil disturbances.Transplant with shovels, trowels, dibblers, augers, or similar tools. Herbaceous plants: Dig smallest holes to accommodate containers; Set crowns at soil level; Tamp. Woody plants: Dig holes 2 x wider than containers or root balls; set crowns or flares 1" above soil level; Backfill and tamp.
Water transplants immediately after planting and mulch transplants with wood chips as needed. Protect transplants from herbivores with plant guards, stake with belts or guy-wires, and support vines with plants, pergolas, trellises, or tripods. Clean up and reuse or recycle containers.
5.2. Sowing
Mix seeds of similar sizes with a bulking agent, such as sharp sand or vermiculite in a ratio of 1 part seed to 3 parts carrier. Divide bulked seed mixes into multiple batches for manual or mechanical sowing in perpendicular passes. Sow or drill seed mixes into clean and smooth seedbeds and roll with a barrel or cultipacker to ensure good seed to soil contact.New plantings require three or more years to establish and thrive. Adapt plantings with multiple installations during establishment.5.3. Bombing
Seed bombing is an ancient practice of no-till plant propagation. Seed bombs, ‘seed balls’, or ‘earth balls’, are mixes of clay, compost, and seed rolled into spheres. Bombs protect seedlings and work well with hydrophobic soils.Select compatible native annuals, biennials, and short-lived perennials for Bombus bombs, such as Bidens, Coreopsis, Chamaecrista, Echinacea, Gaillardia, Grindelia, Phacelia, and Rudbeckia. Use pesticide-free ingredients for health.
Throw one bomb per square foot into prepared seedbeds or finished sheet mulch to create planting matrices. Bomb in sites with full sun, low disturbance risk, and weak plant cover. Bombs dissolve and germinate with 3–5" of water.
- Mix 1–3 parts fine compost and one part seed in a bucket
- Gradually incorporate five parts air-dry red clay powder
- Gently add water until malleable: Avoid water-logging
- Roll seed bombs to 0.5–1.0 inch diameter spheres
- Dry bombs in sunshine for 24–48 hrs to prevent mold
- Bag or bucket well-dried seed bombs for transport
- Store seed bombs in cool and dry conditions until thrown
Short-term (1–3 year) and long-term (≥ 4 year) maintenance are crucial for plantings. If sites are well prepared, then less effort will be required for care after installation. Weed regulation is pivotal during the first and second years after transplanting and/or sowing.Planting maintenance should promote persistent, diverse, year-long blooms and demote weeds. Monitor existing conditions every 2–3 weeks to determine management needs and methods. Refine maintenance strategies according to practice and experience.
6.1. Fostering
Short-term care includes watering, weeding, and pruning young plantings for 1–3 years. More effort spent performing short-term maintenance improves chances of successful establishment and reduces chances of needing to re-prepare plantings. Young plantings need care to grow healthy.6.1.1. Watering
Water consistently and deeply to help young plants establish and outcompete weeds during years 1–3. Mimic gentle rainfall with upward-pointing nozzles, wands, or overhead sprinklers. Irrigate ~2 times per week during late-afternoons or early-evenings with ≥ 1–2" of water measured with a gauge. Program irrigation timers. Monitor precipitation and drought.6.1.2. Weeding
Weed unwanted plants to prevent competition and help plantings establish. Prevent weeds from sowing both in and around plantings. Avoid or minimize soil disturbances with mulch. Targeted cutting or flaming is recommended. Mow, trim, or burn weeds progressively from 10" to 3" tall every ~3 weeks to protect plantings. Learn to identify common weeds.6.1.3. Pruning
Prune with clean, dry, and sharp garden knives, pruners, loppers, or saws depending on stem diameters. Prune damaged, dead, diseased, crossing, rubbing, or inward-growing stems.Fostering can be interrupted due to natural hazards and human errors. Extreme or uneven climate events can affect plant establishment and alter plans. Delays or mistakes risk setbacks and repeated preparing, propagating, installing.Plantings should be allowed to overwinter without fall pruning. Leave the leaves. Save the seeds. Most bumble bee flowers create mulch and provide ornamental interest during the winter.
Cut two-year-old perennials to 6–10" during late winter or early spring. Mow or cut prunings to ≤ 6" lengths and recycle to plantings as mulch. Compost all excess residues for future sheet mulching.
Train young shrubs or trees after 12 months of growth. Avoid pruning young woody plants, but remove all competing, wayward, or weak shoots. Replace damaged leaders with healthy buds or stems.
Create multi-stemmed shrubs and trees to mimic biodiverse shrublands: Cut main stems of two-year-old shrubs or trees to > 3" from ground level; Select 3–4 strong 3-year-old shoots and remove all others; Repeat once every three years.
Cut flowers for arrangements, bouquets, or wreaths. Harvest 1:100 stems to conserve plantings. Arrange stems in containers with balance, scale (height = 1.5 × container height or width), simplicity, and rhythm. Create arrangements with various forms and shapes.
6.2. Caring
Long-term care includes protecting, adapting, and disturbing plantings through time. Continue to promote abundance and diversity of bumble bee flowers, demote weeds, and prune. Protect plantings from weeds, pesticide drift, and browsers as needed. Reduce or eliminate irrigation after year three.Maintain or enhance planting characteristics with intermediate frequencies, severities, and sizes of disturbances. Burn, mow, and/or mulch 1/3 of plant patches per year on three year rotations starting year four. Rotate seasons of patch disturbances to enhance diversity.
Burning reduces leaf litter or thatch, promotes healthy revegetation, and encourages prolific flowering and fruiting. Many native plants have adapted to low intensity seasonal fires that smolder during cool and wet weather. Note: fire flows upslope; southwest facing slopes are most fire prone.
Enhance established plantings by suppressing cover, managing residue, and inter-planting. Mowing, burning, and grazing before enhancement reduces competition and increases seed-to-soil contact. Mowing or grazing to 8–12" during years 1–2 after inter-planting helps establishment.
Adapt planting diversity by re-preparing, re-propagating, and re-installing when needed based on monitoring and evaluating. Collect seeds or divide and transplant pollenizers to self-sufficiently propagate plantings. Reproduce generations of plantings across landscapes through time.
7. Monitoring
Monitor plantings throughout the planning cycle. Regular monitoring helps maximize benefits and prevent problems. Observe at ≤ 3 day intervals to determine maintenance needs. Watch for flagging and prevent wilting during drought with irrigation. Identify and weed seedlings to prevent weed seed rain.Bumble bee monitoring provides a baseline inventory that can help evaluate plantings. Monitor Bombus while plantings are blooming, temps are 40–90 ºF, and winds are ≤ 10 mph. Count, identify, and record all bumble bees observed visiting plantings. Survey plantings for 15 minutes at ≤ 2–3 week intervals.
7.1. Photographing
Photograph Bombus by using a 60–100 mm macro lens and external flash system. Carefully approach and anticipate behaviors while framing photos. Take multiple angles to document key characters: hair colors, cheek lengths, midleg shapes, and absence or presence of pollen baskets.Document the planning cycle through time with a photo station. Affix a three-sided bracket to help align multiple photos to a 4 × 4" post installed near heavily tracked areas for public engagement. Validate and promote plantings with time lapse photos. Share photos of your planting.
7.2. Identifying
Click Here to Identify Bumble Bees. Observe key characteristics including hair colors, cheek lengths, midleg shapes, and absence or presence of pollen baskets. Cross-reference your identifications online at BugGuide, Bumble Bee Watch, Discover Life, and Pollinator Partnership.♣ 8. Evaluating
Evaluate the effectiveness of bumble bee plantings to adapt and improve future plans. Document changes in planting communities over time. Bombus abundance (numbers of individuals) is positively correlated with Bombus diversity.Calculate Bombus diversity indices using counts of species richness (numbers of species) and abundance. Higher diversity index values indicate greater biodiversity. Rank, test, compare, and contrast diversity indices among plantings to evaluate performances.
Materials
Aerators, augers, bags, barriers, binoculars, boots, buckets, cameras, chalk paints, clays, clipboards, cloches, combs, composts, computers, dibblers, earplugs, flagging tapes, floating row covers, garden forks, gloves, goggles, gravels, guides, hand lenses, hardware cloths, harrows, hats, hoses, inoculums, jars, knives, labels, land, landscape fabrics, loppers, mallets, maps, markers, masks, measuring tools, mowers, mulches, nettings, notebooks, nozzles, nursery beds and pots, pants, pencils, pens, plants, plug trays, pond liners, potting mixes, pruners, rakes, rain gauges, references, refrigerators, rollers, sands, saws, screens, scythes, seeds, seeders, seeder trays, shovels, sieves, sleeves, sprinklers, stakes, sunlight, timers, tillers, torches, tractors, transplants, trimmers, trowels, tuning forks, vermiculite, vases, vials, wands, water, weeders, widgers ...Timing
Four year planning cycle with phases: